lunedì 14 dicembre 2020
Psychoverse: Goa Cosmosis 4 by Psychoverse
Psychoverse: Goa Cosmosis 4 by Psychoverse: Goa Cosmosis 4 by Psychoverse
lunedì 27 agosto 2012
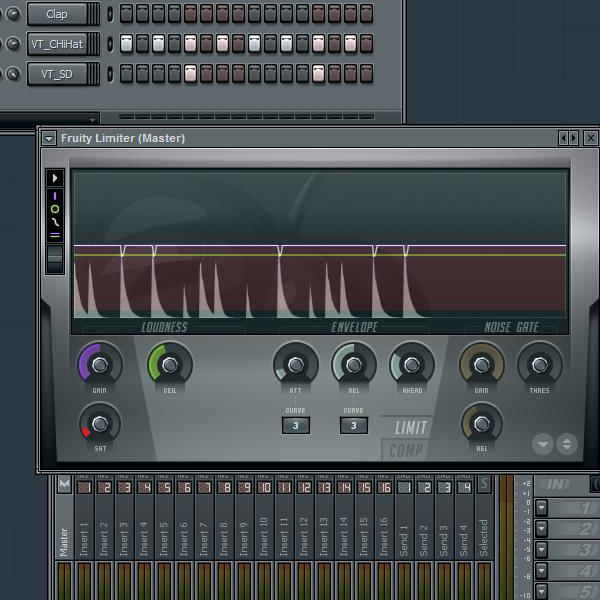
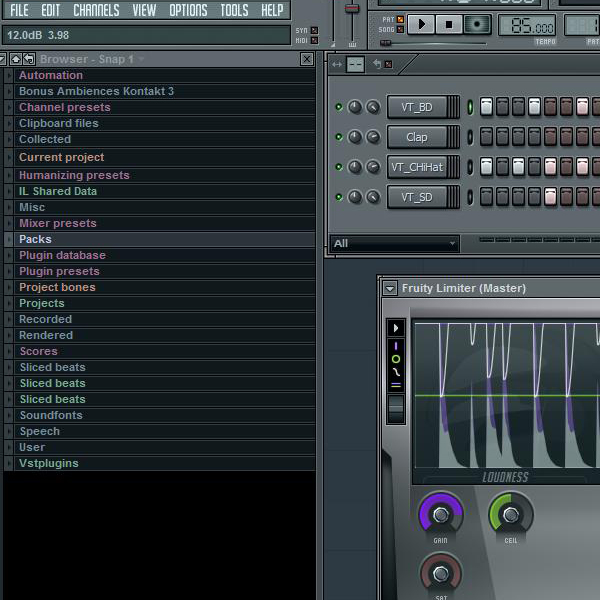
Understanding Your Fruity Limiter
Understanding Your Fruity Limiter:
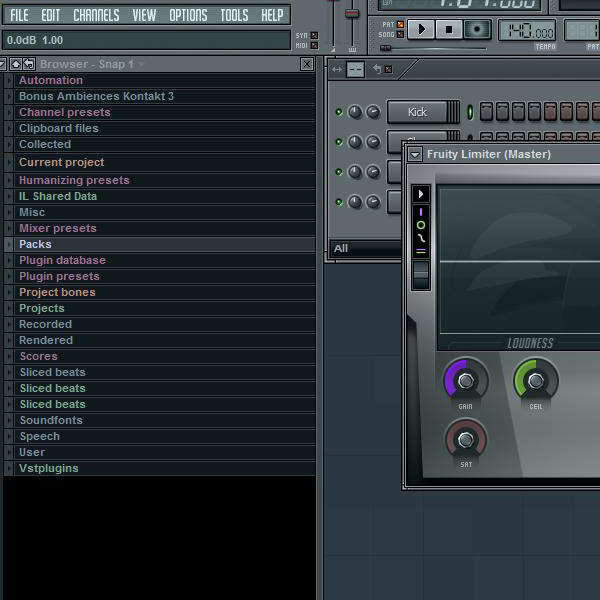
In this tutorial, I’ll be giving you a bit of a lowdown on the Fruity Limiter. Something you may have just thrown onto you Master channel, and didn’t further adjust because your mix sounded instantly better. We’ll be looking at the Loudness knobs today.

The way this knobs defaults upon start-up is at a 5.5 dB boost. This means that the overall sound is being turned up. To most people, this sounds great, and so they’ll keep creating. This can be problematic to some people, however. The result of an overall boost can be clipping. Clipping, for those who don’t know, is distortion. And distortion, as I’m sure we all know, doesn’t sound pretty. Well, maybe on guitars.
So what’s the solution, you ask? Simple. Turn the Gain knob down until the value in the upper left corner reads 0.0 dB.
You may want to add some gain to any sound that is pretty low at a normal level, and you’ve exhausted other options. Although, you probably won’t need a boost as severe as the default 5.5 dB.
Another thing to keep in mind, is that if you add gain to every channel, you will experience a very unpleasant sound known as Gain Reduction. This is when the overall signal is too loud, and to keep the sound from clipping, the sound is automatically turned down (or compressed). This is very unpleasant, and I’ll go into a bit more detail on this in a bit. Simple enough. Moving on.
With this knob, you are giving your limiter the instruction that it cannot output a signal any louder than a value you set. For example, you’re working on a very loud hip-hop mix, but you want some headroom for mastering, so you set the Ceiling value to -2 dB. This means that no matter what, your signal will not exceed -2 dB. Ever.
This knob’s default value is 0.0 dB, but I tend to keep my Ceiling at -2 dB just to be safe when it comes time to mix down my tracks.
Now, with the Ceiling, you can put this on each channel as a way of limiting the output of each one. This can be used to effect, and indeed, be quite handy. Some people I know would do something similar to this when mixing, but instead, use a Compressor with a Ceiling function, and it would effectively do the job.
Also, if you were to put a limiter on each track, you would not have a quite as heavy gain reduction sound on the master channel. When used right, the Ceiling function can bring balance to your tracks.
This adds a bit of distortion to your signal. It defaults to being muted, but in turning the knob counterclockwise, you can color your sound for a unique blend of the original sound, and lightly distorted for effect.
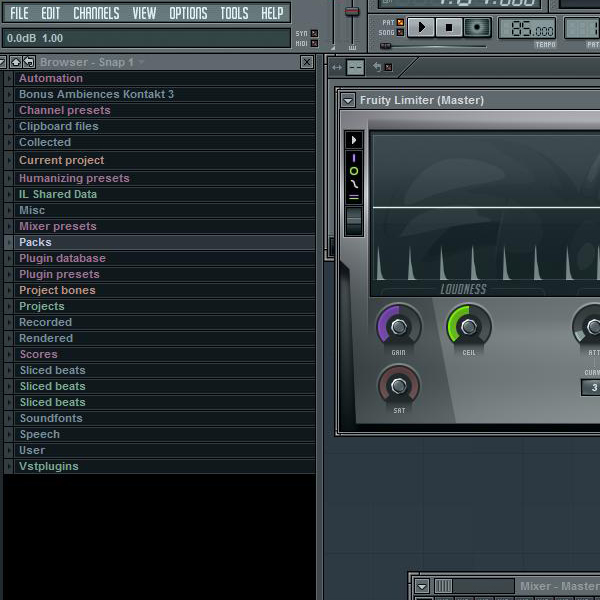
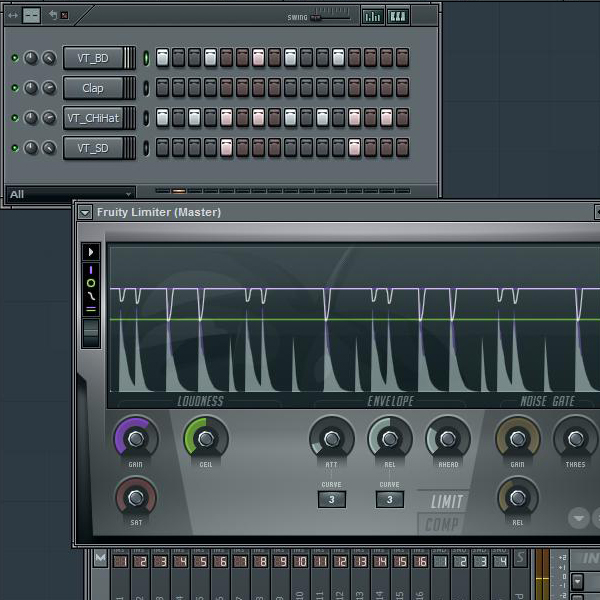
Here’s a prime example for you. I’ve created this drum pattern. And, as you can see on the Gain knob, I’ve boosted the signal to 12 dB, so you can hear the Saturation effect.
With this example, I’ve chosen to just solo the HiHats, as you could hear the effect better. So, below, is the audio loop. The first half is without the Saturation, and the second with it.
Download audio file (HiHat_Tutorial_Loop.mp3)
Could you hear the difference?
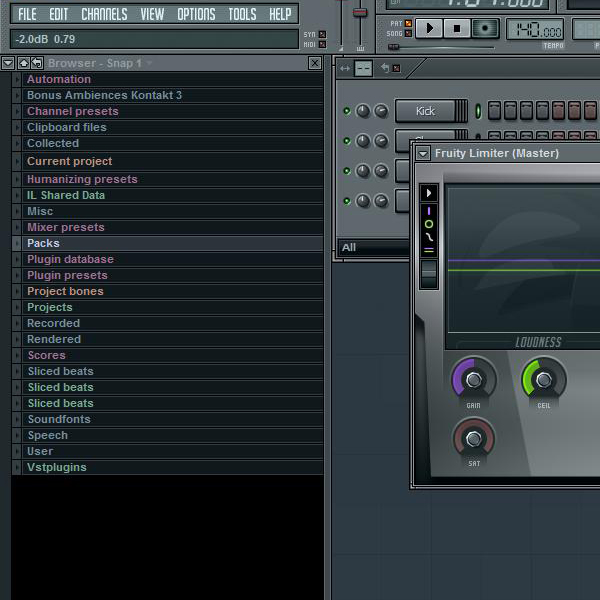
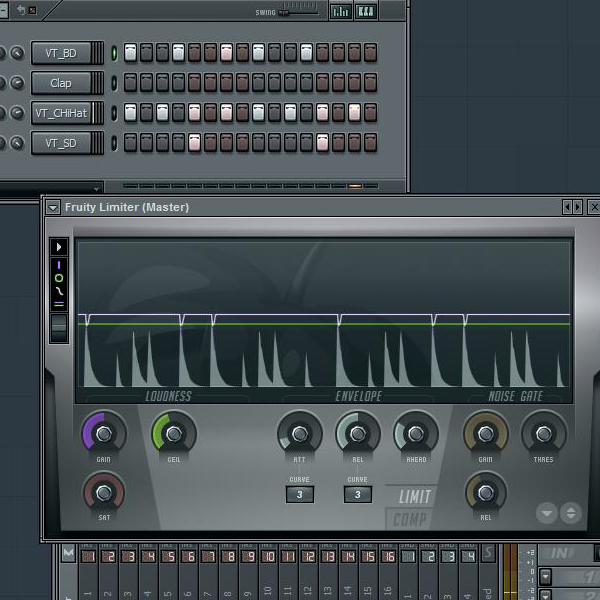
Now, I’ve turned the Gain back down to 0.0 dB, and the Ceiling down to -2.0 dB. Take a look at how much less Gain Reduction there is, now that I’ve set the levels considerably lower.
Hope this helped you understand your Fruity Limiter just a little bit more.


In this tutorial, I’ll be giving you a bit of a lowdown on the Fruity Limiter. Something you may have just thrown onto you Master channel, and didn’t further adjust because your mix sounded instantly better. We’ll be looking at the Loudness knobs today.
Gain
This knob boosts or cuts the sound to any value you want.The way this knobs defaults upon start-up is at a 5.5 dB boost. This means that the overall sound is being turned up. To most people, this sounds great, and so they’ll keep creating. This can be problematic to some people, however. The result of an overall boost can be clipping. Clipping, for those who don’t know, is distortion. And distortion, as I’m sure we all know, doesn’t sound pretty. Well, maybe on guitars.
So what’s the solution, you ask? Simple. Turn the Gain knob down until the value in the upper left corner reads 0.0 dB.
You may want to add some gain to any sound that is pretty low at a normal level, and you’ve exhausted other options. Although, you probably won’t need a boost as severe as the default 5.5 dB.
Another thing to keep in mind, is that if you add gain to every channel, you will experience a very unpleasant sound known as Gain Reduction. This is when the overall signal is too loud, and to keep the sound from clipping, the sound is automatically turned down (or compressed). This is very unpleasant, and I’ll go into a bit more detail on this in a bit. Simple enough. Moving on.
Ceiling
This knob can literally be your best friend.With this knob, you are giving your limiter the instruction that it cannot output a signal any louder than a value you set. For example, you’re working on a very loud hip-hop mix, but you want some headroom for mastering, so you set the Ceiling value to -2 dB. This means that no matter what, your signal will not exceed -2 dB. Ever.
This knob’s default value is 0.0 dB, but I tend to keep my Ceiling at -2 dB just to be safe when it comes time to mix down my tracks.
Now, with the Ceiling, you can put this on each channel as a way of limiting the output of each one. This can be used to effect, and indeed, be quite handy. Some people I know would do something similar to this when mixing, but instead, use a Compressor with a Ceiling function, and it would effectively do the job.
Also, if you were to put a limiter on each track, you would not have a quite as heavy gain reduction sound on the master channel. When used right, the Ceiling function can bring balance to your tracks.
Saturation
Admittedly, this is the knob I’ve used the least…This adds a bit of distortion to your signal. It defaults to being muted, but in turning the knob counterclockwise, you can color your sound for a unique blend of the original sound, and lightly distorted for effect.
Here’s a prime example for you. I’ve created this drum pattern. And, as you can see on the Gain knob, I’ve boosted the signal to 12 dB, so you can hear the Saturation effect.
With this example, I’ve chosen to just solo the HiHats, as you could hear the effect better. So, below, is the audio loop. The first half is without the Saturation, and the second with it.
Download audio file (HiHat_Tutorial_Loop.mp3)
Could you hear the difference?
Gain Reduction
Here’s an example of what I was saying about Gain Reduction. Here’s the same drum pattern as before. I’ve set the Limiter on the Master Channel to it’s default settings. With the Gain set as high as it is with the Ceiling where it’s at, the result is an extreme amount of Gain Reduction as seen in the peaks below:Now, I’ve turned the Gain back down to 0.0 dB, and the Ceiling down to -2.0 dB. Take a look at how much less Gain Reduction there is, now that I’ve set the levels considerably lower.
Bonus Tip
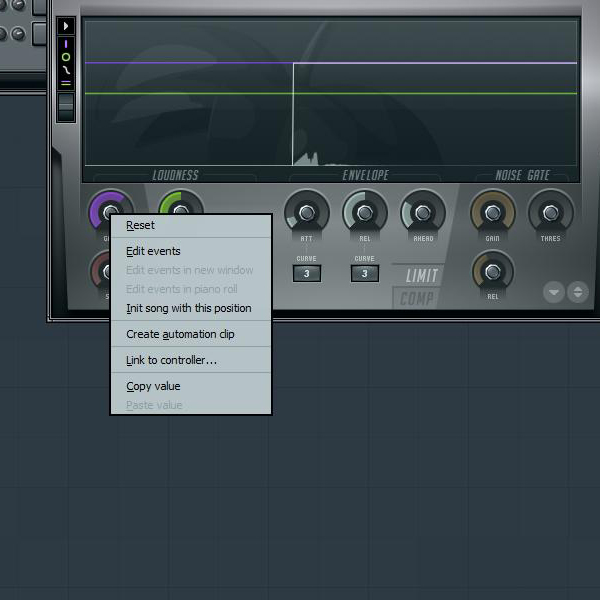
To revert any knob to its default value, simply right-click the knob and select “Reset.”Hope this helped you understand your Fruity Limiter just a little bit more.
venerdì 22 giugno 2012
30 Tips for Ableton Live Everyone Should Know, with Live Master Thavius Beck [Tips, Videos]
30 Tips for Ableton Live Everyone Should Know, with Live Master Thavius Beck [Tips, Videos]:

Whether you’re an existing user or considering it for the first time, this month online school Dubspot is giving away 30 video lessons on using the software, free, through the end of June only. So, I turned to my friend Thavius Beck (Mush Records), LA-based producer and rapper, and master instructor, to make something exclusively for CDM to add a little more free knowledge. If you are playing with Ableton for the first time, you can unlock the 30-day free trial and give it a shot.
I’m just glad to read Thavius’ tips. You’ll feel a little more like an expert afterward, I guarantee – or, alternatively, count how many of these you did already know. (Yes, some of us have been using Live since its first release.)

1. Holding SHIFT while adjusting a Transpose parameter with your UP/DOWN arrow keys will Transpose by an octave instead of 1 semitone
2. “Z” will transpose your computer keyboard DOWN one octave. “X” will transpose it UP one octave
3. “C” increases the velocity of midi notes entered with the computer keyboard or mouse by 20. “V” increases the velocity by 20
4. You can disable the grid in the Arrangement View and in the Sample Editor by Right-Clicking in the grid area, and selecting OFF under Fixed Grid in the contextual menu
5. Individual drum cells in Impulse can be routed to other audio tracks to be mixed separately or given individual effects. Enable the I-O (inputs and outputs) button on the Session View, and in the Audio From tab select your Impulse instrument. In the tab below that, you’ll see all the sounds in your Impulse. Choose one, then either arm the track or set the Monitor status to IN.

6. The Ableton Device Spectrum not only shows you the frequencies being generated by your music in real time, it also will show you the specific note that a frequency corresponds to. Hold your mouse anywhere over the graphical display in Spectrum and a box in the lower right corner will show you the exact frequency, decibel level, and corresponding note based on where your mouse is.
7. If you have Live Suite, when using Slice to New Midi track try slicing to a single Sampler instead of the Built-In preset. When your slices are in the Sampler, you can change the pitch, attack, decay, voices, etc. of all the slices at once without using Macro knobs.

8. Right-clicking on the crossfader allows you to choose different crossfader curves.
9. If your audio interface has multiple outputs that are enabled (go to Live’s Audio Preferences and select Output Config), you can enable a separate CUE output so you can monitor on your headphones without affecting what is coming out of the Master. Make sure your I-O button is enabled, and on the master channel you will see Cue Out and Master Out. If the Cue Out is different from the Master out, your tracks solo buttons will become cue buttons, allowing you to cue up tracks in the headphones while the party people continue to party…

10. AutoFilter and Gate also have sidechain sections that allow an incoming signal to trigger/exaggerate/alter the effect.

11. Right-clicking on the metronome allows you to set a count-in. Helpful if you need to record something right at the beginning of bar 1.

12. If you need to record multiple tracks at once, go to Live’s Preferences, select the Record/Warp/Launch tab, and under the Record section disable the Arm button next to where it says Exclusive (you can also do the same thing to the Solo button if you want to solo multiple tracks). Ed.: I feel a little differently than Thavius on this one. I like that when you arm one track, you de-arm another. Generally, if I do want to arm multiple tracks, I’d rather hold down the “shift” key when selecting arm – the same for Solo. So consider that an alternative tip 12! -PK)
13. If you haven’t already, stay in that same page of Live’s preferences and turn off Auto-Warp Long Samples. This will prevent Live from putting a million incorrect warp markers on your audio when drag a longer audio file into it and enable Warp.
14. Complex warp mode may sound better than Beats for warping full songs and playing them below their original tempo, but be careful… Complex and Complex Pro are the only two warping algorithms that alter the quality of your audio even when it’s playing at the original tempo. They can also introduce some odd phasing issues when playing song with deep sub bass… Complex Pro is good for acapellas, but I suggest using either mode with a bit of caution before playing a gig…
15. If you change the Global Clip Quantization to NONE, you can scrub through your audio in the Sample Editor by hovering your mouse right below the loop bracket (so it becomes a speaker icon), click and hold, then drag the speaker icon through your audio clip.
16. You can create your own Slice to Midi preset by opening up a blank Drum Rack or Sampler, adjusting the parameters to your liking (you could even add effects to the blank Drum Rack if you like), save your new preset by hitting the disk icon in the upper right corner of the effect (or rack), and then dragging that preset into the following folder in your Live Library: Library/Defaults/Slicing. Next time you Slice to a New Midi track, try out your new preset…
17. Another way to manually “slice” a sample is to drop an Audio Clip into several different empty cells in the Drum Rack, and change the start point on each on so they each play a different part of the sample. The same thing can be done with the Sampler.
18. You can remove the Stop button from a blank clip slot by Right-clicking inside of it and selecting “Remove Stop Button” (or use the shortcut Command/Ctrl-E)
19. You can set the launch tempo of a Scene by Right-clicking inside the scene (next to the scene number) and selecting Edit Launch Tempo, then type in the tempo. You can also just rename the scene and type in the tempo followed by BPM.
20. You can also set the launch time signature of a Scene by Right-clicking inside the scene and selecting Edit Launch Time Signature, and then type in the time signature. You can also just rename the scene and type in the time signature (e.g. 7/8).
21. If you press DELETE while any parameter is selected, it will be returned to its default setting.
22. Double-clicking on any of Live’s Browser shortcut buttons will collapse any unfolded folders.
23. You can write your own notes in the Info View of clips by Right-clicking on any audio or midi clip and selecting Edit Info Text
24. You can drag any Groove Pool template into a midi clip slot to see the velocity and timing of the groove.
25. You can change the Launch Quantization of individual clips by enabling the Show Launch Button (the L button under the Clip View) and changing the Quantization from Global to something else.

26. If you want to MIDI or KEY map buttons to let you select or scroll through your Scenes, select with MIDI or KEY map, and you’ll notice buttons that appear above the Master fader and below the Stop Clips button. The first button will play the selected scene, the next two are arrows that can be mapped to buttons to select the next or previous scene, and the final box can be mapped to a rotary knob to scroll through your scenes.
27. You can automate tempo changes in the Arrangement View on the Master channel. On the Master channel in the Arrangement View, select Mixer in the Device chooser box (top chooser box), and then in the Automation control chooser (bottom choose box) you’ll be able to select Song Tempo.
28. If you select a parameter, it will be selected in the Automation chooser box on that track automatically. This is very helpful if you want to automate a parameter but aren’t sure exactly where to find it in the automation chooser box.
29. You can drag and drop a quicktime movie into the arrangement view so you can write music to picture.
30. If you set Locate Points in the arrangement view, you can MIDI or KEY map buttons to the Previous and Next Locator buttons (the left and right arrows above the first track in the arrangement view).

BONUS – Enable Info View to find out about any parameter that your mouse is hovering over. Very helpful if you don’t know all of the areas I refer to in the previous tips. Enjoy!
For more of this kind of knowledge, check out Dubspot’s full 30-lesson course with Thavius free – while you can.
http://www.dubspot.com/ableton3030/
http://www.dubspot.com/ableton3030/


Thavius Beck live in Los Angeles playing the legendary Low End Theory party, in 2009.
Whadayaknow, Ableton users?Whether you’re an existing user or considering it for the first time, this month online school Dubspot is giving away 30 video lessons on using the software, free, through the end of June only. So, I turned to my friend Thavius Beck (Mush Records), LA-based producer and rapper, and master instructor, to make something exclusively for CDM to add a little more free knowledge. If you are playing with Ableton for the first time, you can unlock the 30-day free trial and give it a shot.
I’m just glad to read Thavius’ tips. You’ll feel a little more like an expert afterward, I guarantee – or, alternatively, count how many of these you did already know. (Yes, some of us have been using Live since its first release.)
30 Tips for Ableton Live
Thavius Beck
1. Holding SHIFT while adjusting a Transpose parameter with your UP/DOWN arrow keys will Transpose by an octave instead of 1 semitone
2. “Z” will transpose your computer keyboard DOWN one octave. “X” will transpose it UP one octave
3. “C” increases the velocity of midi notes entered with the computer keyboard or mouse by 20. “V” increases the velocity by 20
4. You can disable the grid in the Arrangement View and in the Sample Editor by Right-Clicking in the grid area, and selecting OFF under Fixed Grid in the contextual menu
5. Individual drum cells in Impulse can be routed to other audio tracks to be mixed separately or given individual effects. Enable the I-O (inputs and outputs) button on the Session View, and in the Audio From tab select your Impulse instrument. In the tab below that, you’ll see all the sounds in your Impulse. Choose one, then either arm the track or set the Monitor status to IN.

6. The Ableton Device Spectrum not only shows you the frequencies being generated by your music in real time, it also will show you the specific note that a frequency corresponds to. Hold your mouse anywhere over the graphical display in Spectrum and a box in the lower right corner will show you the exact frequency, decibel level, and corresponding note based on where your mouse is.
7. If you have Live Suite, when using Slice to New Midi track try slicing to a single Sampler instead of the Built-In preset. When your slices are in the Sampler, you can change the pitch, attack, decay, voices, etc. of all the slices at once without using Macro knobs.
8. Right-clicking on the crossfader allows you to choose different crossfader curves.
9. If your audio interface has multiple outputs that are enabled (go to Live’s Audio Preferences and select Output Config), you can enable a separate CUE output so you can monitor on your headphones without affecting what is coming out of the Master. Make sure your I-O button is enabled, and on the master channel you will see Cue Out and Master Out. If the Cue Out is different from the Master out, your tracks solo buttons will become cue buttons, allowing you to cue up tracks in the headphones while the party people continue to party…
10. AutoFilter and Gate also have sidechain sections that allow an incoming signal to trigger/exaggerate/alter the effect.
11. Right-clicking on the metronome allows you to set a count-in. Helpful if you need to record something right at the beginning of bar 1.

12. If you need to record multiple tracks at once, go to Live’s Preferences, select the Record/Warp/Launch tab, and under the Record section disable the Arm button next to where it says Exclusive (you can also do the same thing to the Solo button if you want to solo multiple tracks). Ed.: I feel a little differently than Thavius on this one. I like that when you arm one track, you de-arm another. Generally, if I do want to arm multiple tracks, I’d rather hold down the “shift” key when selecting arm – the same for Solo. So consider that an alternative tip 12! -PK)
13. If you haven’t already, stay in that same page of Live’s preferences and turn off Auto-Warp Long Samples. This will prevent Live from putting a million incorrect warp markers on your audio when drag a longer audio file into it and enable Warp.
14. Complex warp mode may sound better than Beats for warping full songs and playing them below their original tempo, but be careful… Complex and Complex Pro are the only two warping algorithms that alter the quality of your audio even when it’s playing at the original tempo. They can also introduce some odd phasing issues when playing song with deep sub bass… Complex Pro is good for acapellas, but I suggest using either mode with a bit of caution before playing a gig…
15. If you change the Global Clip Quantization to NONE, you can scrub through your audio in the Sample Editor by hovering your mouse right below the loop bracket (so it becomes a speaker icon), click and hold, then drag the speaker icon through your audio clip.
16. You can create your own Slice to Midi preset by opening up a blank Drum Rack or Sampler, adjusting the parameters to your liking (you could even add effects to the blank Drum Rack if you like), save your new preset by hitting the disk icon in the upper right corner of the effect (or rack), and then dragging that preset into the following folder in your Live Library: Library/Defaults/Slicing. Next time you Slice to a New Midi track, try out your new preset…
17. Another way to manually “slice” a sample is to drop an Audio Clip into several different empty cells in the Drum Rack, and change the start point on each on so they each play a different part of the sample. The same thing can be done with the Sampler.
18. You can remove the Stop button from a blank clip slot by Right-clicking inside of it and selecting “Remove Stop Button” (or use the shortcut Command/Ctrl-E)
19. You can set the launch tempo of a Scene by Right-clicking inside the scene (next to the scene number) and selecting Edit Launch Tempo, then type in the tempo. You can also just rename the scene and type in the tempo followed by BPM.
20. You can also set the launch time signature of a Scene by Right-clicking inside the scene and selecting Edit Launch Time Signature, and then type in the time signature. You can also just rename the scene and type in the time signature (e.g. 7/8).
21. If you press DELETE while any parameter is selected, it will be returned to its default setting.
22. Double-clicking on any of Live’s Browser shortcut buttons will collapse any unfolded folders.
23. You can write your own notes in the Info View of clips by Right-clicking on any audio or midi clip and selecting Edit Info Text
24. You can drag any Groove Pool template into a midi clip slot to see the velocity and timing of the groove.
25. You can change the Launch Quantization of individual clips by enabling the Show Launch Button (the L button under the Clip View) and changing the Quantization from Global to something else.
26. If you want to MIDI or KEY map buttons to let you select or scroll through your Scenes, select with MIDI or KEY map, and you’ll notice buttons that appear above the Master fader and below the Stop Clips button. The first button will play the selected scene, the next two are arrows that can be mapped to buttons to select the next or previous scene, and the final box can be mapped to a rotary knob to scroll through your scenes.
27. You can automate tempo changes in the Arrangement View on the Master channel. On the Master channel in the Arrangement View, select Mixer in the Device chooser box (top chooser box), and then in the Automation control chooser (bottom choose box) you’ll be able to select Song Tempo.
28. If you select a parameter, it will be selected in the Automation chooser box on that track automatically. This is very helpful if you want to automate a parameter but aren’t sure exactly where to find it in the automation chooser box.
29. You can drag and drop a quicktime movie into the arrangement view so you can write music to picture.
30. If you set Locate Points in the arrangement view, you can MIDI or KEY map buttons to the Previous and Next Locator buttons (the left and right arrows above the first track in the arrangement view).
BONUS – Enable Info View to find out about any parameter that your mouse is hovering over. Very helpful if you don’t know all of the areas I refer to in the previous tips. Enjoy!
For more of this kind of knowledge, check out Dubspot’s full 30-lesson course with Thavius free – while you can.
http://www.dubspot.com/ableton3030/
“Did You Know?” Video Series
Very much along the lines of these 30 tips, earlier this year, Thavius also did a series of videos for Dubspot entitled “Did you know?” They focus on topics you perhaps should know about Ableton Live, but that some users – beginning and advanced alike – might have missed. Here’s that complete series.Previously
Once More, From the Top: Learn Ableton Live in Videos, from the Very Beginninghttp://www.dubspot.com/ableton3030/
martedì 19 giugno 2012
Matching Levels to Produce Better Audio
Matching Levels to Produce Better Audio:
Compression without taking loudness or additional gain into consideration can be hazardous to your audio. Since everything louder will sound better, bassier and punchier, a compressed audio signal with more gain than the uncompressed signal will always trick you into believing it to be better.
The trick is to level match both the compressed and uncompressed audio to make an unbiased decision as to which actually sounds better. Let’s look at a way to do that.
One of the reasons you think louder, usually more compressed, audio sounds better is because it increases the perceived loudness of the low and high-end. Our ears can’t hear a flat frequency response from 20 Hz to 20 kHz. They are much more sensitive to the middle range than the lower and the high range. Therefore, increasing the volume (or compressing everything together and increasing the loudness) makes the bass and treble more audible to our ears, tricking us into thinking it sounds better.
The Fletcher-Munson curve below shows how we are more susceptible to middle frequencies at lower levels, and we need to increase the sound pressure level(that’s fancy talk for volume) in order to hear the bass at the same level as the mids.
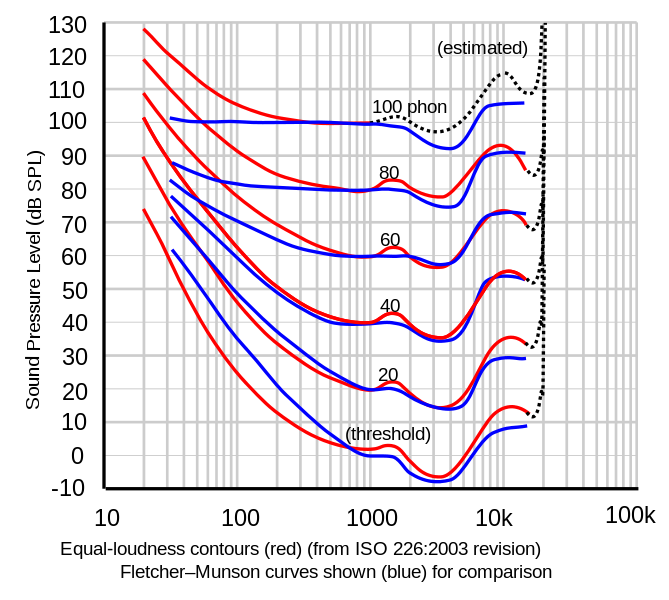
Taken from WikipediaThis means that if you heavily compress a signal AND raise its gain or volume, your ears will think it sounds better, even if it doesn’t. The only way to double-check and make sure that your audio actually sounds better is to listen to both the uncompressed and compressed signal at the same level. Then you will hear the subtleties of the audio and hear how the compressor really works.
Additionally, some do prefer more compression on their audio, and there’s nothing wrong with that. This tutorial is written to warn you and teach you about proper ways of compressing. Louder-means-better mentality is fine as long as you’ve actually double checked to make sure that it is in fact better, not only louder.
Download audio file (dry.mp3)
The ratio is fairly high, the attack is medium so it lets the transients through and the make-up gain is set to +4 dB to compensate for the compression.
 This is what the audio sounds like at this point:
Download audio file (wet.mp3)
Seems to sound punchier and a little better. Or does it?
Download audio file (matched.mp3)
The only real difference here is the level obviously, so it won’t sound radically different than the previous compressed file.
Here are the different compressor settings. I maybe should have exaggerated these settings a bit but I assume you get my point.
It starts off with two bars of the uncompressed signal, followed by a louder compressed signal. At that point you would be led to believe that the compressed signal is the bomb and you should just squeeze the hell out of it. Well, not exactly. The uncompressed signal returns for four more bars, the first two being an intro of some sorts that’s different than the rest of the file so it’s hard to use them for any real measurement. So in the last six bars or so you can listen to the dry, non-compressed audio compared with the level-matched and compressed audio file.
If all that is too hard to understand, here’s a diagram. The blue regions are the ones that are playing, the gray ones are muted.
 Here is the back and forth audio test.
Download audio file (levelmatching.mp3)
I tried to get the levels as close as possible for you to hear the difference. The biggest differences I hear is the lack of bass in the matched file. Low-end takes up a lot of energy and a compressor will chomp down on bass immediately. Therefore, when you have a matched signal you have compressed the bass in the compressed file while leaving it alone in the untreated audio.
If you would have raised the make-up gain as well you would have raised the bass, making your ears hear the bass better due to perceived loudness and the aforementioned Fletcher-Munson curves. But since you left the audio at the same level you not only don’t hear the bass as well due to the loudness curve, but since your compressor is compressing it as well there’s even less of it than before. Just listen to how the compressed and level-matched signal has a more hollow sound than the untreated audio.


Compression without taking loudness or additional gain into consideration can be hazardous to your audio. Since everything louder will sound better, bassier and punchier, a compressed audio signal with more gain than the uncompressed signal will always trick you into believing it to be better.
The trick is to level match both the compressed and uncompressed audio to make an unbiased decision as to which actually sounds better. Let’s look at a way to do that.
Perceived Loudness
The biggest mistake while compressing is thinking something sounds better just because it’s louder. Your ears are easily deceived unfortunately, so anything that sounds louder, seems better. Obviously this has plagued the music industry for quite a while now with louder and louder records coming out that are essentially competing to be the loudest record on the radio, without any regard for the actual sound quality.One of the reasons you think louder, usually more compressed, audio sounds better is because it increases the perceived loudness of the low and high-end. Our ears can’t hear a flat frequency response from 20 Hz to 20 kHz. They are much more sensitive to the middle range than the lower and the high range. Therefore, increasing the volume (or compressing everything together and increasing the loudness) makes the bass and treble more audible to our ears, tricking us into thinking it sounds better.
The Fletcher-Munson curve below shows how we are more susceptible to middle frequencies at lower levels, and we need to increase the sound pressure level(that’s fancy talk for volume) in order to hear the bass at the same level as the mids.
Taken from Wikipedia
Subtle Techniques
Keep in mind, this is a fairly subtle technique. I’ll be using a simple jingle to demonstrate the difference compression has on a full mix, but it applies to any compressed signal, from a kick drum to a vocal group.Additionally, some do prefer more compression on their audio, and there’s nothing wrong with that. This tutorial is written to warn you and teach you about proper ways of compressing. Louder-means-better mentality is fine as long as you’ve actually double checked to make sure that it is in fact better, not only louder.
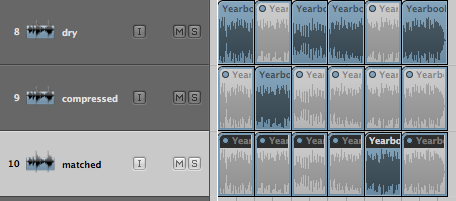
Dry Signal
Here is the dry audio, without any processing. Mind you that it’s obviously a mixed multi-track but it has a fair amount of dynamic range that we can still ruin with too much compression.Download audio file (dry.mp3)
Compressed Signal
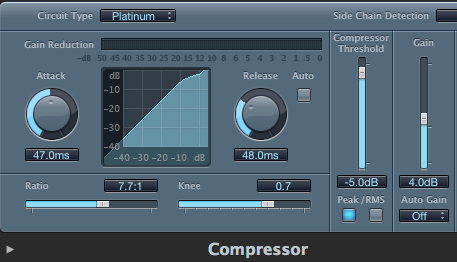
I’ve added a bit of compression to the audio at this point, compressing around 4 dB or so.The ratio is fairly high, the attack is medium so it lets the transients through and the make-up gain is set to +4 dB to compensate for the compression.
Download audio file (wet.mp3)
Seems to sound punchier and a little better. Or does it?
Matched Signal
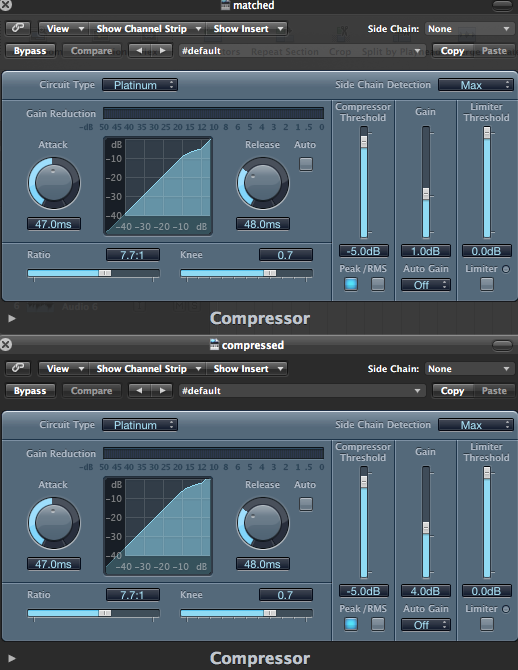
The matched signal is compressed the exact same way, except I’ve used a level meter to make sure both the uncompressed and compressed signal are at the same level/volume.Download audio file (matched.mp3)
The only real difference here is the level obviously, so it won’t sound radically different than the previous compressed file.
Here are the different compressor settings. I maybe should have exaggerated these settings a bit but I assume you get my point.
A/B Testing
Flipping through the different audio samples, it can be hard to gauge which one sounds better than the other. In order for you to hear it back to back I made an audio file that flips through the different audio samples.It starts off with two bars of the uncompressed signal, followed by a louder compressed signal. At that point you would be led to believe that the compressed signal is the bomb and you should just squeeze the hell out of it. Well, not exactly. The uncompressed signal returns for four more bars, the first two being an intro of some sorts that’s different than the rest of the file so it’s hard to use them for any real measurement. So in the last six bars or so you can listen to the dry, non-compressed audio compared with the level-matched and compressed audio file.
If all that is too hard to understand, here’s a diagram. The blue regions are the ones that are playing, the gray ones are muted.
Download audio file (levelmatching.mp3)
I tried to get the levels as close as possible for you to hear the difference. The biggest differences I hear is the lack of bass in the matched file. Low-end takes up a lot of energy and a compressor will chomp down on bass immediately. Therefore, when you have a matched signal you have compressed the bass in the compressed file while leaving it alone in the untreated audio.
If you would have raised the make-up gain as well you would have raised the bass, making your ears hear the bass better due to perceived loudness and the aforementioned Fletcher-Munson curves. But since you left the audio at the same level you not only don’t hear the bass as well due to the loudness curve, but since your compressor is compressing it as well there’s even less of it than before. Just listen to how the compressed and level-matched signal has a more hollow sound than the untreated audio.
Conclusion
Next time you’re adding compression on every track, don’t just use the bypass button. If you’re adding a bunch of make-up gain to the signal then the compressed audio will sound louder and better to your ears. But in the context of the mix as a whole, it might not sound better at all. Keep that in mind when you’re compressing in the future.martedì 12 giugno 2012
Datsik Excision Bassline Tutorial (Ni Massive) - Dark sounds.
Datsik Excision Bassline Tutorial (Ni Massive) - Dark sounds.:
 | Views: 149044 396 ratings | |
| Time: 08:44 | More in Howto & Style |
domenica 10 giugno 2012
sabato 9 giugno 2012
venerdì 8 giugno 2012
Reverb For A Better Tomorrow
Reverb For A Better Tomorrow:
Here is something to try if you want to spice up your reverb. I’ve become very interested recently in finding ways to make computer/MIDI based productions sound organic and create some of the nonlinear feel that live recordings and real instruments have. Whether you feel this is a worthwhile detail to add is up to you, but it only takes a few minutes to set up and is a good example of ‘thinking outside the box’ that will hopefully promote your having some creative ideas of your own.
Usually when we are mixing and it comes time to add reverb, we bus it to a separate channel, play around with reverb settings and mix level and call it a day. This is all well and good, but sometimes maybe a bit too vanilla and static, especially if you are working with a rather flat MIDI recording or patch to begin with.
For this example I am using about the most basic kick drum patch available in Logic and set it to a quantized 1/4 note pattern all at an 80 velocity level.
Download audio file (Dry.mp3)
The original kick.
The first thing I like to do is turn my reverb into a chord. On my reverb bus, the first insert I will put on will actually be a pitch shifting plug-in to shift the incoming audio a few steps to match the key of the song or to just slightly offset the pitch to create a more interesting sound.
In this example, the kick drum is a G and I’ve pitched the bused kick up 3 semitones to form the ‘naming tones’ of a G minor chord.
 Download audio file (Chordal Kick.mp3)
The kick mixed with a pitch shifted version of itself.
With the Space Designer reverb in the next insert slot, I set the tail to decay in a tempo related way (here I have it set to 1/8 notes) and roll off some of the highs (to set it further back in the mix) and extreme lows (to keep the bottom end clear), which is all rather straightforward reverb technique.
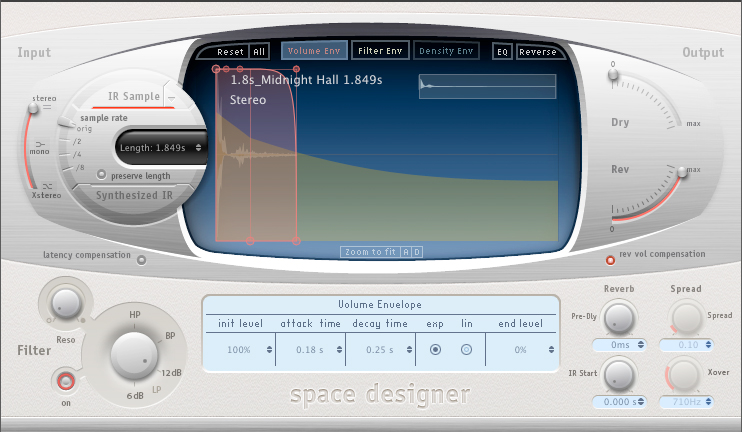 The reverb tail section.
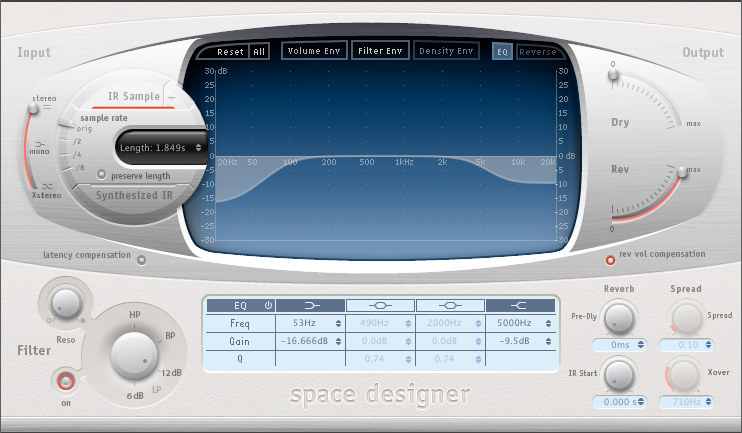 The reverb EQ section
Download audio file (Reverb.mp3)
The added reverb creating a chordal relationship with the kick.
The next thing I like to do is to modulate my reverb in some way. Here I have put a flanger on it and dropped the mix down so it is barely noticeable. This helps to keep the reverb from being static even in static MIDI/patch situations.
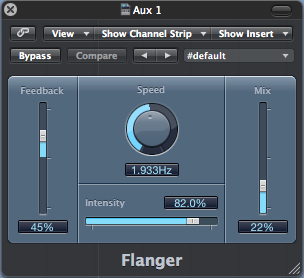 Download audio file (Flange.mp3)
The flanger modulating the reverb.
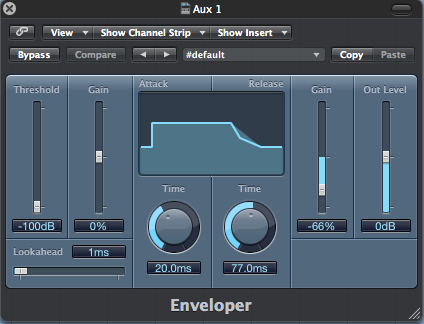 The final step I usually take is to slap an enveloper plugin on (I am a big fan of tight sounds, so I use a ton of these), and tighten the reverb up to personal taste. This may seem a bit counter-intuitive as I set my reverb tail to a musical value and then completely disregard it with the enveloper.
The logic in this though is that I can not modulate almost all of the parameters in Space Designer and can automate the enveloper’s release to act on the already set 1/8 note time to slightly extend or shorten it.
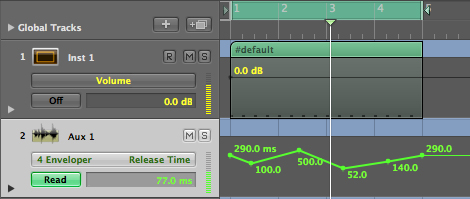 Here I have just penciled in some random changes to the enveloper to subtly change the reverb release time and give the kick a greater sense of movement while still maintaing its presence in the center of the mix. You can get a lot more scientific with it and pencil in longer decay times for louder portions and shorter decay times for softer portions (or however you see fit) so that things ebb and flow in accordance with your song.
Download audio file (Env.mp3)
The enveloper with the tail being modulated through automation.
Download audio file (Vanilla.mp3)
How our final output would have sounded with just the reverb and no other effects.
There is obviously a ton more you can do (tremolo comes to mind) so have fun experimenting around with this and liven up the static.


Here is something to try if you want to spice up your reverb. I’ve become very interested recently in finding ways to make computer/MIDI based productions sound organic and create some of the nonlinear feel that live recordings and real instruments have. Whether you feel this is a worthwhile detail to add is up to you, but it only takes a few minutes to set up and is a good example of ‘thinking outside the box’ that will hopefully promote your having some creative ideas of your own.
Usually when we are mixing and it comes time to add reverb, we bus it to a separate channel, play around with reverb settings and mix level and call it a day. This is all well and good, but sometimes maybe a bit too vanilla and static, especially if you are working with a rather flat MIDI recording or patch to begin with.
For this example I am using about the most basic kick drum patch available in Logic and set it to a quantized 1/4 note pattern all at an 80 velocity level.
Download audio file (Dry.mp3)
The original kick.
The first thing I like to do is turn my reverb into a chord. On my reverb bus, the first insert I will put on will actually be a pitch shifting plug-in to shift the incoming audio a few steps to match the key of the song or to just slightly offset the pitch to create a more interesting sound.
In this example, the kick drum is a G and I’ve pitched the bused kick up 3 semitones to form the ‘naming tones’ of a G minor chord.
The kick mixed with a pitch shifted version of itself.
With the Space Designer reverb in the next insert slot, I set the tail to decay in a tempo related way (here I have it set to 1/8 notes) and roll off some of the highs (to set it further back in the mix) and extreme lows (to keep the bottom end clear), which is all rather straightforward reverb technique.
Download audio file (Reverb.mp3)
The added reverb creating a chordal relationship with the kick.
The next thing I like to do is to modulate my reverb in some way. Here I have put a flanger on it and dropped the mix down so it is barely noticeable. This helps to keep the reverb from being static even in static MIDI/patch situations.
The flanger modulating the reverb.
The logic in this though is that I can not modulate almost all of the parameters in Space Designer and can automate the enveloper’s release to act on the already set 1/8 note time to slightly extend or shorten it.
Download audio file (Env.mp3)
The enveloper with the tail being modulated through automation.
Download audio file (Vanilla.mp3)
How our final output would have sounded with just the reverb and no other effects.
There is obviously a ton more you can do (tremolo comes to mind) so have fun experimenting around with this and liven up the static.
Iscriviti a:
Post (Atom)