Compression without taking loudness or additional gain into consideration can be hazardous to your audio. Since everything louder will sound better, bassier and punchier, a compressed audio signal with more gain than the uncompressed signal will always trick you into believing it to be better.
The trick is to level match both the compressed and uncompressed audio to make an unbiased decision as to which actually sounds better. Let’s look at a way to do that.
Perceived Loudness
The biggest mistake while compressing is thinking something sounds better just because it’s louder. Your ears are easily deceived unfortunately, so anything that sounds louder, seems better. Obviously this has plagued the music industry for quite a while now with louder and louder records coming out that are essentially competing to be the loudest record on the radio, without any regard for the actual sound quality.One of the reasons you think louder, usually more compressed, audio sounds better is because it increases the perceived loudness of the low and high-end. Our ears can’t hear a flat frequency response from 20 Hz to 20 kHz. They are much more sensitive to the middle range than the lower and the high range. Therefore, increasing the volume (or compressing everything together and increasing the loudness) makes the bass and treble more audible to our ears, tricking us into thinking it sounds better.
The Fletcher-Munson curve below shows how we are more susceptible to middle frequencies at lower levels, and we need to increase the sound pressure level(that’s fancy talk for volume) in order to hear the bass at the same level as the mids.
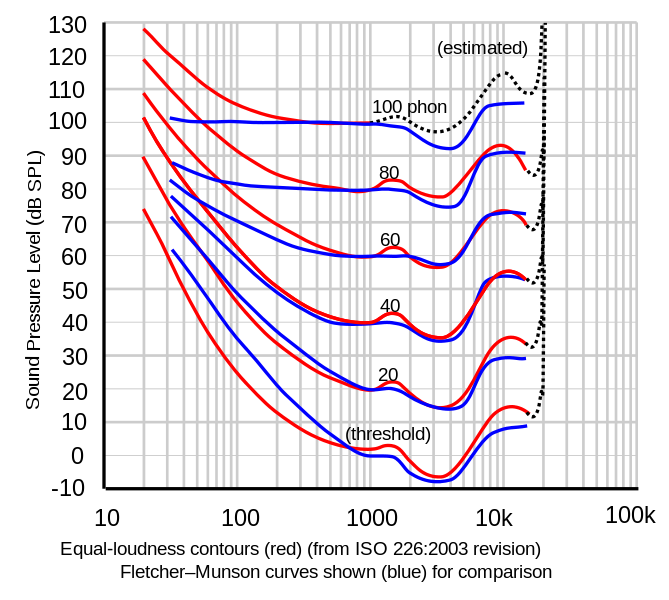
Taken from Wikipedia
Subtle Techniques
Keep in mind, this is a fairly subtle technique. I’ll be using a simple jingle to demonstrate the difference compression has on a full mix, but it applies to any compressed signal, from a kick drum to a vocal group.Additionally, some do prefer more compression on their audio, and there’s nothing wrong with that. This tutorial is written to warn you and teach you about proper ways of compressing. Louder-means-better mentality is fine as long as you’ve actually double checked to make sure that it is in fact better, not only louder.
Dry Signal
Here is the dry audio, without any processing. Mind you that it’s obviously a mixed multi-track but it has a fair amount of dynamic range that we can still ruin with too much compression.Download audio file (dry.mp3)
Compressed Signal
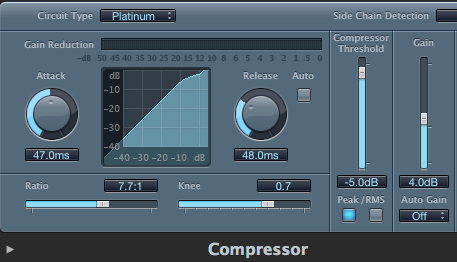
I’ve added a bit of compression to the audio at this point, compressing around 4 dB or so.The ratio is fairly high, the attack is medium so it lets the transients through and the make-up gain is set to +4 dB to compensate for the compression.
Download audio file (wet.mp3)
Seems to sound punchier and a little better. Or does it?
Matched Signal
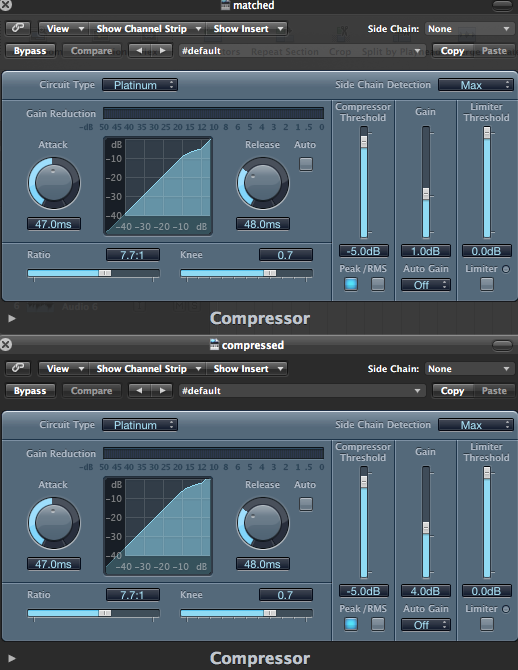
The matched signal is compressed the exact same way, except I’ve used a level meter to make sure both the uncompressed and compressed signal are at the same level/volume.Download audio file (matched.mp3)
The only real difference here is the level obviously, so it won’t sound radically different than the previous compressed file.
Here are the different compressor settings. I maybe should have exaggerated these settings a bit but I assume you get my point.
A/B Testing
Flipping through the different audio samples, it can be hard to gauge which one sounds better than the other. In order for you to hear it back to back I made an audio file that flips through the different audio samples.It starts off with two bars of the uncompressed signal, followed by a louder compressed signal. At that point you would be led to believe that the compressed signal is the bomb and you should just squeeze the hell out of it. Well, not exactly. The uncompressed signal returns for four more bars, the first two being an intro of some sorts that’s different than the rest of the file so it’s hard to use them for any real measurement. So in the last six bars or so you can listen to the dry, non-compressed audio compared with the level-matched and compressed audio file.
If all that is too hard to understand, here’s a diagram. The blue regions are the ones that are playing, the gray ones are muted.
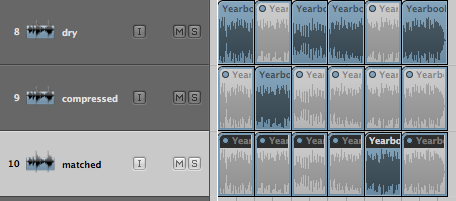
Download audio file (levelmatching.mp3)
I tried to get the levels as close as possible for you to hear the difference. The biggest differences I hear is the lack of bass in the matched file. Low-end takes up a lot of energy and a compressor will chomp down on bass immediately. Therefore, when you have a matched signal you have compressed the bass in the compressed file while leaving it alone in the untreated audio.
If you would have raised the make-up gain as well you would have raised the bass, making your ears hear the bass better due to perceived loudness and the aforementioned Fletcher-Munson curves. But since you left the audio at the same level you not only don’t hear the bass as well due to the loudness curve, but since your compressor is compressing it as well there’s even less of it than before. Just listen to how the compressed and level-matched signal has a more hollow sound than the untreated audio.
Nessun commento:
Posta un commento