Here is something to try if you want to spice up your reverb. I’ve become very interested recently in finding ways to make computer/MIDI based productions sound organic and create some of the nonlinear feel that live recordings and real instruments have. Whether you feel this is a worthwhile detail to add is up to you, but it only takes a few minutes to set up and is a good example of ‘thinking outside the box’ that will hopefully promote your having some creative ideas of your own.
Usually when we are mixing and it comes time to add reverb, we bus it to a separate channel, play around with reverb settings and mix level and call it a day. This is all well and good, but sometimes maybe a bit too vanilla and static, especially if you are working with a rather flat MIDI recording or patch to begin with.
For this example I am using about the most basic kick drum patch available in Logic and set it to a quantized 1/4 note pattern all at an 80 velocity level.
Download audio file (Dry.mp3)
The original kick.
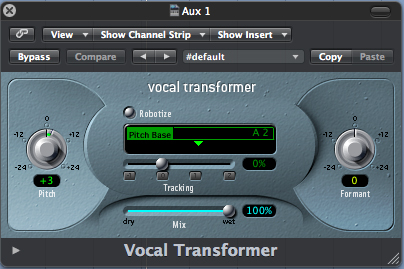
The first thing I like to do is turn my reverb into a chord. On my reverb bus, the first insert I will put on will actually be a pitch shifting plug-in to shift the incoming audio a few steps to match the key of the song or to just slightly offset the pitch to create a more interesting sound.
In this example, the kick drum is a G and I’ve pitched the bused kick up 3 semitones to form the ‘naming tones’ of a G minor chord.
The kick mixed with a pitch shifted version of itself.
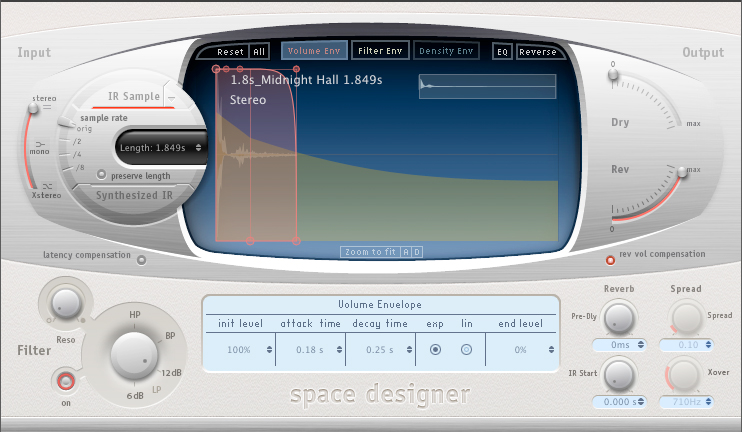
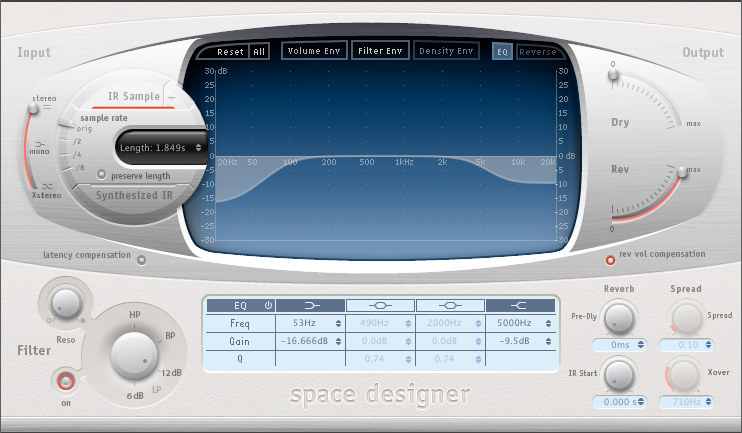
With the Space Designer reverb in the next insert slot, I set the tail to decay in a tempo related way (here I have it set to 1/8 notes) and roll off some of the highs (to set it further back in the mix) and extreme lows (to keep the bottom end clear), which is all rather straightforward reverb technique.
Download audio file (Reverb.mp3)
The added reverb creating a chordal relationship with the kick.
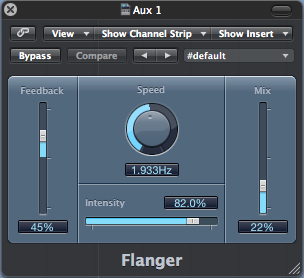
The next thing I like to do is to modulate my reverb in some way. Here I have put a flanger on it and dropped the mix down so it is barely noticeable. This helps to keep the reverb from being static even in static MIDI/patch situations.
The flanger modulating the reverb.
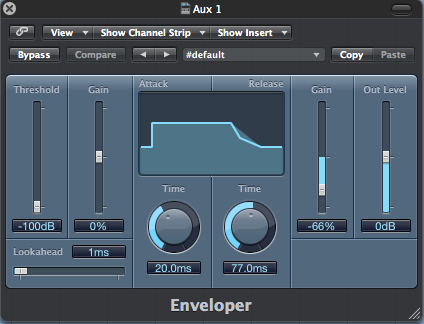
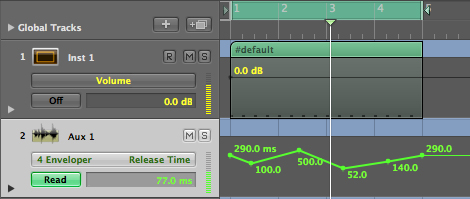
The logic in this though is that I can not modulate almost all of the parameters in Space Designer and can automate the enveloper’s release to act on the already set 1/8 note time to slightly extend or shorten it.
Download audio file (Env.mp3)
The enveloper with the tail being modulated through automation.
Download audio file (Vanilla.mp3)
How our final output would have sounded with just the reverb and no other effects.
There is obviously a ton more you can do (tremolo comes to mind) so have fun experimenting around with this and liven up the static.
Nessun commento:
Posta un commento