This entry is part 8 of 8 in the series 3D Mixing
In the final installment of the series, we are going to look at the final effects on the signal chain (Master EQ, Master Reverb, Master Limiter), and discuss the various final print options.Master EQ
For EQ on the master bus, ‘gentle’ is the word of the day. By the time you are ready to even begin thinking about mastering, your frequency control should be almost, if not completely solid (one of the reasons I went back and did a bit of remixing in the previous chapter). The master bus EQ is meant to be a gentle and wide band EQ which balances overall frequency bands as opposed to individual sounds and instruments. It is a bit of a mental shift from mixing, but a necessary one all the same and a good one to practice.In chronological order of how I came upon these settings (obviously do what works best for you), I first used a low shelving band to boost the bass a bit, then went and boosted the highs with a shelving band as well. I then boosted the main area of the melody (400-ish). I then realized the highs were too high (embracing trial and error, if you hadn’t noticed, is essential) and switched the high shelving boost to a high shelving cut and moved it to effect just the very top of the spectrum. I then added a steep low cut to knock out the flabby sub-bass the low shelving boost had accentuated.
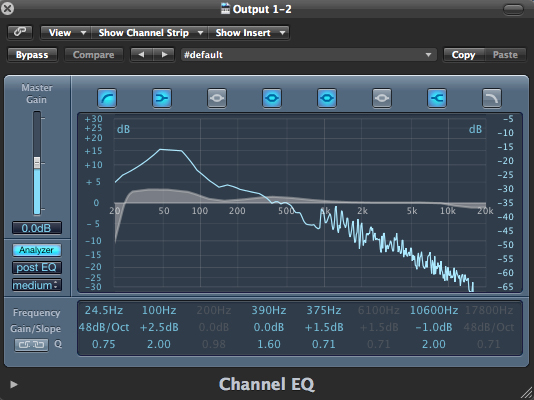
The loop before EQ-ing.
Download audio file (EQ After.mp3)
You can definitely hear how these minor changes have livened up the sound.
Reverb
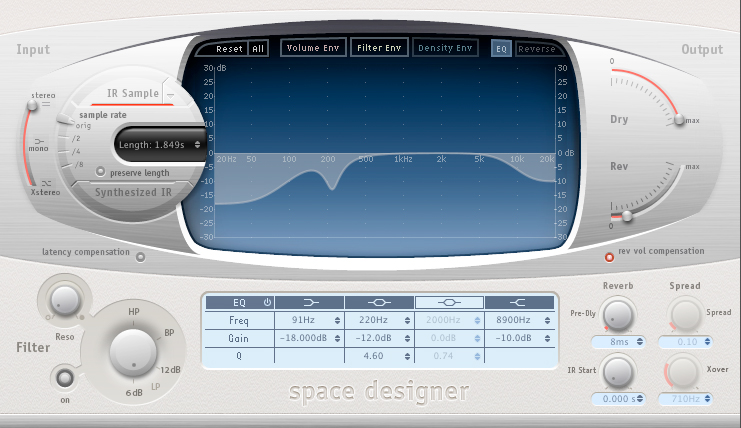
One of my favorite tricks in mixing as well as mastering is slapping a reverb on a bus to give subtle and wide depth information to either the group or, in this case, the entire track. This helps to place all sounds in a similar virtual space and widens the overall stereo field to produce a more robust and full sound. The thing to remember about reverb, again, is subtlety. Unless you are going for a special effect, reverb should be used sparingly so as to not overshadow the original sound.Here I have simply put on Logic’s Space Designer IR reverb with 100% dry and about 5% wet and set to a 1/4 note decay (500 ms in this case-good idea is to set your reverb to musical settings and so it decays before the next hit).
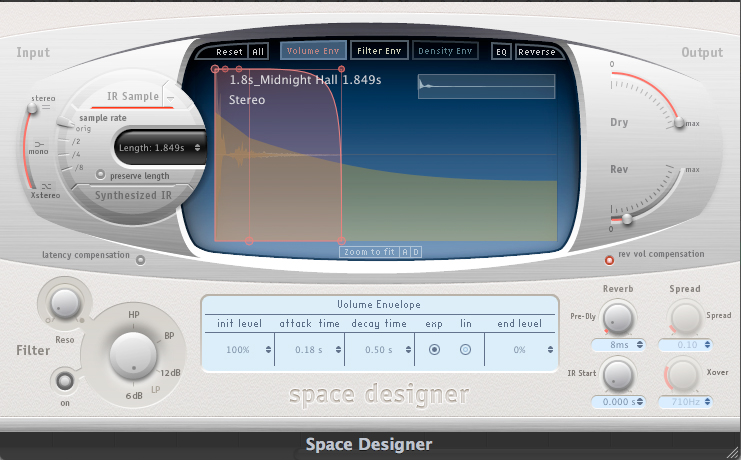
The amplitude envelope of the reverb.
Download audio file (Reverb Before.mp3)
The loop prior to bus reverb.
Download audio file (Reverb After.mp3)
The track after bus reverb; thicker and deeper.
LOUD!
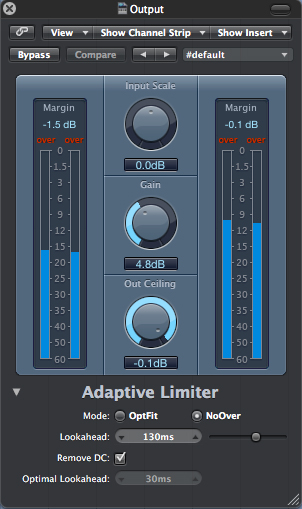
The final effect to put on the channel is the limiter. The limiter captures all transient information and allows you to compress the signal for absolute loudness. The limiter can also be used on various mix elements (the kick is often treated with limiting to help it punch through the mix), but it is always (in this day and age, anyway) placed on the master bus to maximize loudness and keep peaks at a consistent level. This is the stage where we can begin to think about peak vs. RMS levels within the overall track.Logic’s Adaptive Limiter has three main sections to be aware of. The input meter on the right tells us the amplitude of the incoming signal in real time. The middle section allows us to scale the input signal (used to greatly increase or decrease the input), increase gain and set the output ceiling. Finally, the output meter to the right shows us the output amplitude in real time.
Here we can see our input is peaking with 1.5 dB of headroom, therefore I do not need to use the scaling knob at all. I then set the output ceiling to -0.1 dB as that is the absolute loudest I want the track to reach (0 dB is theoretically the loudest I want it to go, but some room for error is usually a good idea). I then increase the gain by over the 1.5 input ceiling to get the limiter working and increase it slowly. Once things begin to sound obnoxious, I decrease slowly and only slightly to find a happy medium between loudness and musicality. Here I have settled on a moderate 4.6 dB.
Download audio file (ADB.mp3)
Before.
Download audio file (ADA.mp3)
After.
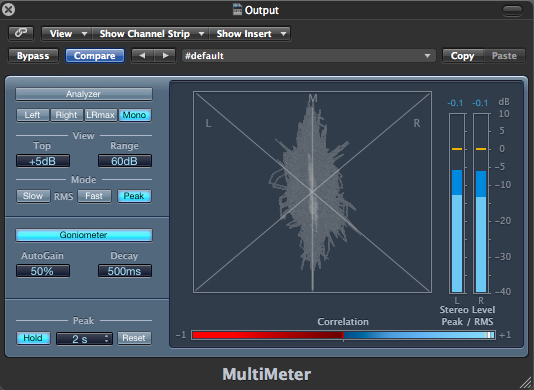
Multimeter Part 2
Finally, we want to put on another multimeter in order to look at our output to make sure we are not somehow missing something crucial. We can see from the second multimeter that we have a wide frequency range, have a good ovular stereo/phase image and have a difference of about 12 dB between the peak and RMS levels (anywhere from 6-15 dBs of difference is usually pretty good).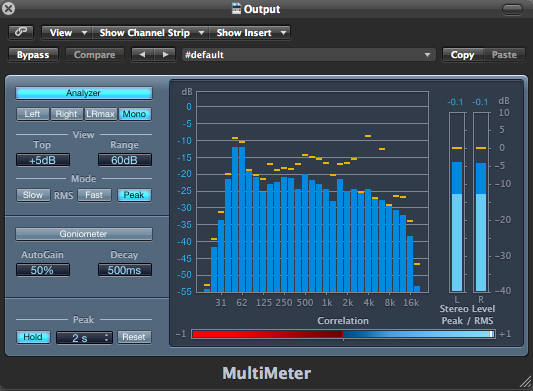
Final Print
So, if you can remember way back, you’ll no doubt recall that we are working with a 48K sample rate @ 24 bits. As such, we have to convert our final print to 44.1K and 16 bits which is CD standard and in doing so we are going to have to apply dither.Dither is a complex algorithm which is applied to the audio file during bounce/print to minimize the quantization artifacts that sample and bit rate conversions impart. Without going too in depth (I may do so in a future article) what that means is that dither will add subtle amounts of noise to the file to hide the imperfections that the conversion process creates.
A good basic analogy to make sense of this process is to think about it in terms of the resolution of a photograph. If you convert a 300 dpi image to a 100 dpi image, it is going to look grainy due to the decreased resolution. If we were to subtly blur (add noise to) the 100 dpi image to hide the sharp corners of the grain this would decrease our ability to see the grain pattern and give a better final result than otherwise.
Logic comes with four different dither options, POWr #1, POWr #2, POWr #3 and UV22HR. They each come with a rather vague description in the manual and are summed up by this statement:
‘The dithering mode that sounds best to you is primarily dependent on the audio material, and your personal taste. Audition the audio material with each of the dithering modes to determine the right setting. In some cases, you may find that the best results are achieved by using no dithering at all.’
So, all said and done, we are going to have to try all of them.

Download audio file (none.mp3)
No Dither
Download audio file (1.mp3)
Option 1
Download audio file (2.mp3)
Option 2
Download audio file (3.mp3)
Oprion 3
Download audio file (UV.mp3)
The UV option
They all sound about the same (and are made even more uniform during the necessary conversion to MP3 for internet publication) so picking a ‘best’ one in this instance is a fairly arbitrary decision. For some reason I am somewhat drawn to the UV dither option. From where I’m sitting it just sounds a bit more defined than the others, but obviously it is really up to personal taste and has even more to do with your personal listening environment.
Download audio file (Start.mp3)
Where we started
Download audio file (UV.mp3)
The final product
So there you have it, our final product. Although this final step is fairly subjective, there are a few rather sceintific guidelines to follow throughout your project in terms of bit depth and sample rate to ensure a better final product:
- Record in the highest bit depth and sample rate as possible.
- Mix in the same bit depth and sample rate as you recorded in.
- Convert your project to standard only once, and at only the final step. If you are sending to a mastering studio, let them do it.
- If you are doing it yourself, audition each option available, if you are sending it out, make sure they give you different dither options to choose from.
W
Nessun commento:
Posta un commento